- Your School Type
- Solutions
- Resources
- Blog
- Events
- More
- Contact Us
- Book a Demo
- Get a Quote

Did you know that Oliver isn’t just a Library Management System? You can use Oliver to keep track of resources throughout your entire school.
Archival information, textbooks and computers are the most popular resources being tracked by our clients but they are also tracking musical instruments, sheet music, lawn mowers, cricket bats, puppets and even Lego robot kits.
Your options are endless!
Whether you create a specific branch for equipment or have a collection of equipment within your library branch is a personal choice. Some factors that might affect your decision are:
For a small school with a limited number of resources, the simplest option might be to have a single library branch with one of your collections called equipment.
A medium-size school might have a library branch and a department branch. The department branch could have multiple collections for sports, AV, computers, music, etc.
A larger school might set up a branch each for the IT department, music department or science department etc. The IT department branch could be used to track computers, computer software CDs, computer books and much more. The advantage of this option is that each branch gets its own home page. The IT department home page could be used to advertise computer classes, new computer games being purchased or opening hours for the computer room, etc.
If you are not sure, start small and use Oliver’s Exchange function to change the location of your resources when you are ready to create a more complex system.
The equipment BibType is already set up in Oliver for you. The following additional fields will automatically be available at the copy level when you allocate a resource to the BibType of equipment:
How are the resources going to be catalogued? Will you have a resource title of Computers and add different brands and models at the copy level or will you have more specific resource titles like Apple MacBook Pro 13 inch, Apple MacBook Pro 15 inch, Acer Chromebook, etc.
Will you mention additional items in the Notes field (e.g. this computer comes with a mouse and charger) or will you give every charger, mouse, HDMI cable etc. its own cataloguing record and barcode? The answer to this could depend on how much time you have available and how frequently these items are being lost.
Oliver provides you with the ability to track equipment maintenance at the copy level. This might be to track how often light bulbs are changed in data projectors or batteries are replaced in laptops. You do this by going to the individual copy level of your equipment item and clicking on the Add Maintenance button.

To add even more value to your equipment register you could scan documents like warranties and user manuals and attach them to the resource details.
If you have concerns about the information being visible in the search results then there are several options available to you. The first option is to choose Hidden in Search when editing your BibType. This means that the BibType, and all resources with this BibType will be hidden from everyone in the search results. Another option is to apply security to an individual resource. Security is controlled by User Roles which means that a teacher could login and access the resource but it could be restricted from view for students.
Advanced users might like to try creating new BibTypes or duplicating existing BibTypes. You could also use Page Layout to add additional fields and Translations to change the field names to make them more relevant for these newly created BibTypes. For example the Music Department might like to make a Sheet Music BibType and use Page Layout and Translations to add fields like Musical Form (sonata, symphony, opera), Instruments (violin, orchestra) and Performers (London Philharmonic Orchestra).
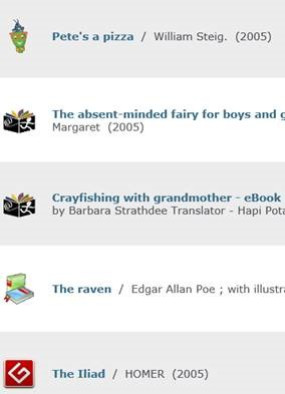
GMD enables an additional level of clarification for a BibType. For example, the resources in the image below are all part of the BibType of eBooks. I have used GMD’s displaying website logo’s to provide additional information about the free websites where these eBooks can be downloaded from.
To do this go to Management > GMD, Create a New GMD and attach an image to the GMD.
If you allocate an image to the GMD it will override the BibType image and the GMD image will be displayed in the search results instead of the BibType image. If there is no GMD image then the BibType image will be displayed.
Another example could be a BibType of Musical Instruments and GMD’s of String, Brass, Woodwind and Percussion. Upload an image of a violin, trumpet, clarinet and drum to make your GMD’s easy to spot in the search results.
Hopefully you have picked up a few tips for tracking resources in your school. Have a go at some of the above ideas. In the next article I will discuss setting up a branch for school archives.
For assistance - use the Help area in your Oliver v5 system to search for the following help articles:

Editor’s note: this post was originally published in November 2016 and was updated for freshness, relevance and accuracy in March 2020.
 LearnPath