- Your School Type
- Solutions
- Resources
- Blog
- Events
- More
- Contact Us
- Book a Demo
- Get a Quote
Are you taking advantage of all the features in Oliver v5 to engage your students? Here are a few ideas for you to try.
While some schools prefer to use the Oliver “browse lists” as their home page, others have found that setting the “News Page” as their library home page can be an effective way to communicate with students and staff, to promote the library and events, and to showcase resources.
With Oliver and Orbit you have a wide range of information boxes that you can include on your News Page.
The Oliver and Orbit news pages are also customisable with easy-to-use formatting options helping you to reflect your library, your school.
Showcase new titles
So, you’ve found budget, found exciting new books to engage students and encourage reading for pleasure, now it’s time to promote your purchases to the students. While school library displays can be a great way to showcase new books, your library News Page can act as a “virtual library display”.
For cloud hosted users, setting up a slider in Oliver to promote new books, extends your “display” to everyone who has access to the system including students that don’t visit the library often, staff, school leadership, and parents.

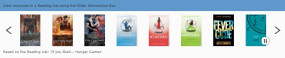
Promote reading lists
Does your school participate in the Premier’s Reading Challenge? Perhaps you want to “display” Book Week Titles, class reading lists, teacher recommendations… the list goes on. Sliders can be a fantastic way to provide easy access to reading lists of any description.
Add videos
Short videos can be very engaging for students, as well as a quick and easy way to communicate with them. Perhaps you don’t have time or opportunity for a library orientation program. Perhaps you do but find that students sometimes need a refresher. Maybe you could embed our Orbit guided tour for students or Oliver guided tour for students.
We have also produced this short video to introduce students to staying safe online.
Draw attention to a new or underused source
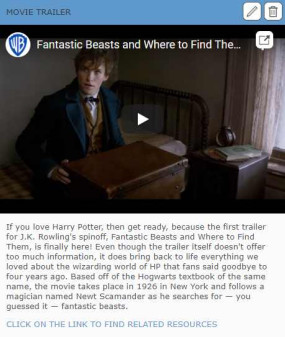
Perhaps you have a collection of online resources, for example, ClickView videos or subscription databases. Make the most of these resources by creating an “advertisement” on your news page. Students will then be able to use this information box to search your resource type on a particular topic.
Link to LearnPath
So, you’ve created a fantastic learning hub for students to help them with their studies. Link directly to LearnPath via the News Page to give easy access to your curated resources.
Embed a survey
Would you like to know how your library is doing? Perhaps you would like to include students in purchasing decisions or design decisions. Maybe you could create and embed a link to a survey. This can be a great way to get student voice into the library, create a sense of ownership, and engage them with “their” library.
You could also:
Perhaps you have some ideas we haven’t thought of… we’d love to hear from you or see your library News Page! Email communications@softlinkint.com with your ideas or a screenshot.
Are you taking advantage of the library map function in Oliver v5?
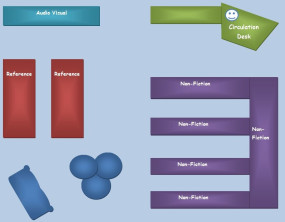
If you have uploaded a map or photo of your library into Oliver v5, then an icon will appear next to the resource in the catalogue details screen. Below are examples of the map icon in Oliver and Orbit.
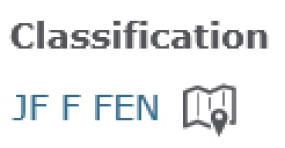
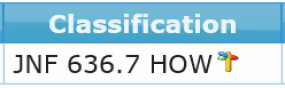
When the student clicks on the map icon, the map or photo will open and a flashing icon will appear where the resource can be found.
Image file formats including jpg, png, gif and bmp can be used.
For assistance - use the Help Area in Oliver v5 to search for the following Help Article:
Below are two great ideas for using the Map function in Oliver v5.
1. Competition to design a Library Map
Library Maps can be as basic or advanced as you like, hand drawn or created with drawing software. Rather than paying an architect or graphic designer to draw your library map, why don’t you run a competition and get the students to design one for you.
The competition could be run as a lunch time activity or get the teachers involved and have them bring their class to the library; this could be a great start of year activity for the Graphics or Art Classes.
The winner of the competition can have their map displayed inside Oliver v5 for the year.
Depending on the size and layout of your library you could use one map or several e.g. one for the Fiction and another for the Non-fiction.
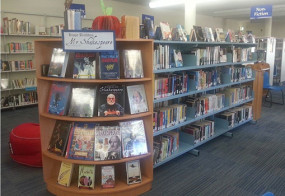
2. Using the Map function for a library display
Do you ever put books out on display and find that you are constantly having to help students find the books as they aren’t in their usual location? Here is a great idea for creating a library display and then temporarily re-locating the resources and linking them to a map so they are easy to find.
For assistance - use the Help Area in Oliver v5 to search for the following Help Articles:
Editors note: This blog was originally published in August 2016, updated in August 2021 for freshness, accuracy, and relevancy.
 LearnPath